Oracle Management Cloud (OMC) Log Analytics allows you to ingest and store logs of any type for any length of time. As it’s a PaaS metered cloud service, you’ll want to be familiar with how to maintain the logs you want, for the length of time you want and keep your storage and costs under control. This is easy to do with the scheduled purge functionality.
Identifying Logs and Evaluating Storage Size
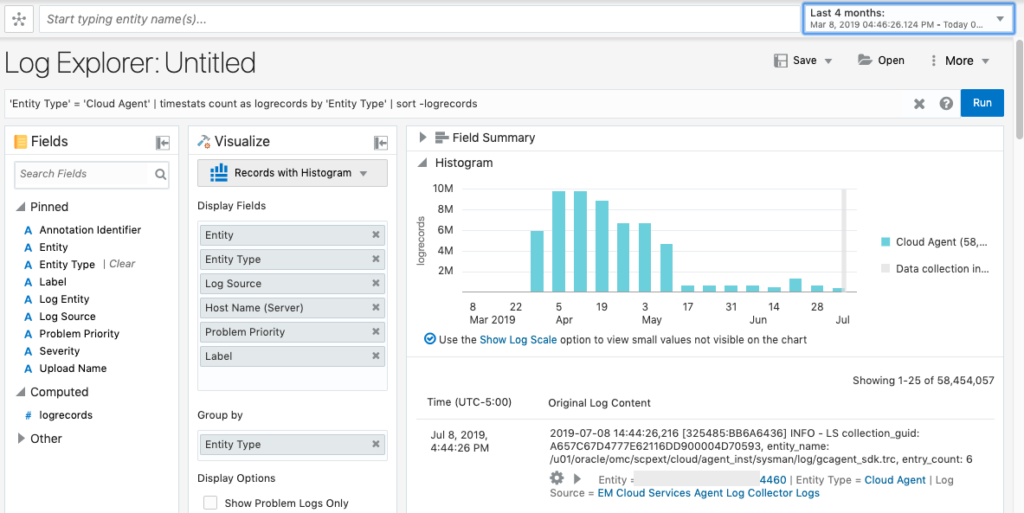
By evaluating what logs you have uploaded to OMC, and evaluating the storage size that each log type consumes, you’ll be able to make some decisions about what type of files to purge and when to purge them. You may also have requirements to keep certain files longer than others. Diagnostic trace and alert logs are typically only needed for a few weeks to months. On the other hand, you may need to keep audit log files for 6 months or longer. To make these decisions, you’ll want to query your logs by source and type. This can be done by using Log Analytics with a Summary Table query such as:
*| fields 'Raw Size' | stats sum('Raw Size') as 'Total Size (Bytes)', count('Log Source') as 'Log Entries' by 'Log Source' | eval 'Average Size (bytes)' = 'Total Size (Bytes)' / 'Log Entries'
This will result in a chart that breaks down each log source by total bytes, number of entries and and average bytes.

As you can see in my lab environment I have mostly Cloud Agent files. These logs are great for troubleshooting agent issues, but I don’t really need to keep them around. Let’s see how far back my logs go.
Creating a Purge Policy
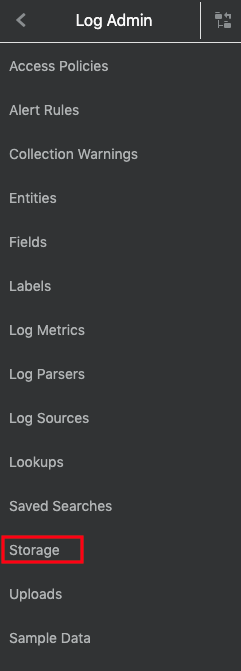
From the query above, you can tell I have logs going back to March. This can consume quite a bit of space as we saw above. I like to have the logs turned on and available so that they’re there when I need them, but I can definitely purge them regularly to keep only a few weeks at a time. To do this, go to Log Analytics > Log Admin and click on Storage.
At the top of the page you’ll see the Utilization which is the total storage used. You can purge by time or by policy. Purging by time will allow you to run a one time purge of logs older than a specific time. Purging by policy will allow you to schedule a purge based on time and query to purge on a regular basis. In this case, we’re going to create a policy. Click on Purge By Policy, then then click Create New Policy.

I’m going to keep 4 weeks of Cloud Agent logs and purge anything older than that on a regular basis. Provide a Purge Policy Name, then under Purge Data Older than select how much data to keep. Choose the Schedule Interval to run the purge every day or every week and at what time. Then enter a Query to filter the logs to purge. In the query above, we used Entity Type = ‘Cloud Agent’ to filter all the Cloud Agent logs. That same query can be used to create the purge policy. Before saving a purge policy, I can test it in Log Explorer to see which records will be deleted. Finally, click Save.

After saving, I wait a bit and check to see that I now only have 4 weeks of Cloud Agent logs.

Back on the Storage page, you can also confirm that the new purge policy completed successfully for further validation. You can edit the policy to adjust the query or time if needed, and disable if you no longer want to purge these logs.

With the ability to schedule purges for specific sets of logs, you can maintain your log space however you want it. Keep audit logs for 6 months, syslog for 1 month and database for 2 months, or however you see fit. For each set of logs, just create a purge policy with the specific query and time you need.